The return of Once Burned Pizza

There comes a time when every blog must take an unexpected hiatus. For Once Burned Pizza, that was when I entered my final semester of grad school. But now that I am officially done (done!) with grad school and have a lot more free time on my hands, I’m ready to get back to writing and back to cooking.

Peer pressured to turn on stove*I officially announce this hiatus OVER!*

So on to the good stuff, like my cooking skills.

This week I came across this slightly embarrassing timehop. Two years ago, I didn’t even know how to turn on the stove in my college house so my roommates forced me to turn on the stove.

Two years later, not only can I turn on the stove in my apartment, but I just made a carrot cake from scratch and it actually tastes pretty good. Keep an eye out for my next post where I describe the triumphs and tribulations of making carrot cake.

The Invention of the Pepper-Egg-a-Muff

photo 1 (12) One of my roommates moved out and took the internet with her, which means I haven’t been trying as many new recipes as usual. (Wednesday when the internet arrives can’t come soon enough!) Plus it’s two weeks before finals, which means I’m not cooking as much as normal.

However, I did create the pepper-egg-a-muff and I am in love.

You may be asking yourself: what is a pepper-egg-a-muff? 

I’m glad you asked! A pepper-egg-a-muff is an egg in a bell pepper ring, on top of an english muffin.

When I was still living with my parents, the egg-a-muff — egg on top of an english muffin — was a staple for when we didn’t have much food in the house. Plus it works for breakfast or for dinner.

I’ve been dying to create the egg in a bell pepper ring ever since I first saw it online. And since english muffins were on sale this week, I decided to combine the egg in a bell pepper ring with the egg-a-muff to create the pepper-egg-a-muff. Who knew I’d be creating new recipes already?

photo 2 (12)

How to create the pepper-egg-a-muff:

You need:

  • 2 eggs
  • 1 bell pepper
  • 1 english muffin

Step 1: After you wash the pepper, cut it in half, creating rings. The thicker the ring, the better it will hold the egg. Cut away the seeds and white skin of the pepper.

Step 2: Put the rings in a sprayed pan, heating on low heat till the edges turn slightly brown.

Step 3: Break one egg into a small container. Pour the egg into one of the bell peppers. Repeat.

Step 4: Cook the egg until the edges of the egg turn white. I flipped my egg at this stage to cook the other side but depending on your preferences, this isn’t necessary.

Don’t Drop a Potato Down the Disposal

photo 1 (8)I realized I didn’t have potatoes in like a few months, so I figured it was probably time to learn how to make potatoes on my own. Plus I found this recipe that used parsley, which I needed to use up before it went bad.

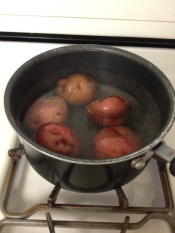
Some things I learned: potatoes take much more time to make than I would have thought. I also learned to make sure I put water completely covering the potatoes because otherwise they won’t actually cook for the first ten minutes.

As well, be careful when dumping out the water from the pot into the sink. I accidentally dropped one potato down the disposal, which was very sad because an extra potato would have meant more scrumptious food. Woops. I tried to get out out of the disposal, lest it still look edible, but the potato was cooked so perfectly I wasn’t able to get it out.

photo 2 (9)The recipe I used for these potatoes was pretty simple. You mix together olive oil, salt, garlic salt, pepper, cayenne pepper, and parsley. The recipe also says you can add jalapeño pepper but I figured the cayenne pepper would give it enough of a kick.

I would recommend chopping up the parsley. The recipe doesn’t specifically say you should but if you look at the pictures, the parsley was definitely chopped up. I tried doing it in the bowl after I mixed together the mixture and it didn’t really work out.

photo 1 (9)Then you’re supposed to use a fork and mash the potatoes up. My sister is really good at mashing potatoes. I clearly didn’t inherit that skill because they weren’t really mashing up, so I just ended up cutting them.

After you mash the potatoes, you drizzle on the mixture you created and pop them in the preheated oven for a half hour.

Tphoto 3 (8)hese potatoes are probably one of the most delicious things I have ever eaten. However, you really can’t eat these potatoes without a glass or two of milk or water. They definitely have a kick to them that make them a little spicy. If you’re like me and don’t like spicy food, don’t add in the jalapeño peppers. The rest of the mixture will be hot enough.

I would highly recommend trying these. Although they take a long time to make, I know I shall be eating these again!

…But next time I will make sure I don’t drop a potato down the disposal.

Caprese Grilled Cheese AKA My New Favorite Food

Sometimes your mozzarella cheese is starting to get moldy, so you have to use it up. After browsing a few recipes online I stumbled across the caprese grilled cheese. As a fan of grilled cheese and pesto, I knew this recipe maker was on to something.

photo 2 (8)photo 1 (7)photo 3 (6)

Plus, this is super easy to make. You put some butter on the outside of the bread, cut up the mozzarella and tomatoes, spread the pesto on the inside of the bread, and add some basil. Then you just grill it much like regular grilled cheese – keep flipping the bread every few minutes until each side is golden brown.

Despite being so simple to make, this sandwich is absolutely delicious. I may never be able to go back to standard grilled cheese again.

How to Chiffonade Basil

Chiffonade is a weird word. When I first saw “4 leaves basil, chiffonade” in a recipe for spinach tortellini, I thought it was saying that I needed to make the basil look like chiffon fabric or something.

All I can say is thank goodness for Google. Turns out chiffonade is a certain way to cut herbs such as basil.

photo 4 (4)Here’s how to chiffonade basil:

Step 1: Layer all the basil leaves on top of each other

Step 2: Tightly roll the basil leaves hamburger style, as opposed to hot dog style. Thank you elementary school art teacher for that analogy!

Step 3: Cut the leaves across the roll. The tighter the slices, the finer the basil cuts.

So that’s how you chiffonade basil – much easier than I anticipated.

Arugula Hard To Find In Grocery Stores

I stumbled across this 5-ingredient pesto pasta salad and decided to give it a try because I absolutely adore pesto. Plus it used mozzarella and I’ve always wanted to buy a ball of mozzarella from the grocery store, but never had an occasion to do so.

Fair warning, the recipe I linked to is sponsored by a company. But despite that, I just used a mix of ingredients I found in my grocery store.

photo 1 (6)

This recipe is super simple, and as the title of the recipe states, it only requires 5 ingredients. I did forget to buy red pepper when I was making this recipe but I’m sure it would taste even better with the red pepper. — How I forgot one of the five ingredients of a five ingredient meal is beyond me. I thought I had picked a red pepper up but then it wasn’t in my car when I got home.

Despite the fact I did forget one ingredient, even I couldn’t mess this recipe up. You just make some pasta, cut up some mozzarella into cubes, toss on  the pesto, and add arugula. Then you’d add the red pepper if you remembered to pick it up in the grocery store.

Let me tell you something about arugula. photo 2 (7)It is incredibly hard to find in the grocery store by itself and is incredibly expensive. Because it was so expensive on its own, I ended up buying a spring salad mix and then picking out the arugula for this meal. That  way you have your salad for the week but you also have your arugula.

I added a little bit of parsley to give it a little extra flavor (and because I needed to use it up before it spoiled) but you definitely don’t need it.

Tip: In order to get the pesto to evenly coat all the ingredients, put your salad in a tupperware container. Place the lid on the container and then shake.

Bonus Tip: I would wait for your pasta to cool down before adding the other ingredients. I didn’t because I was starving at the time and the pasta kind of melted the mozzarella. But it still tasted delicious so I wasn’t complaining.

Easy Cucumber Sandwiches

photo 3 (5)For some reason, I’ve been really craving a cucumber sandwich for a while. So I decided to make variation of this recipe on a larger scale.

First, I cut off the crusts off some wheat bread.

Second, I spread some cream cheese on the bagel and sprinkled a little bit of italian seasoning over the cream cheese.

Third, I put some fresh dill top of the cream cheese mixture. I like putting the dill under the cucumbers because it sticks better.

Finally, I put the cut cucumbers on top of the cream cheese mixture.

And voila! You have a tasty cucumber sandwich.

You Can’t Beat Funfetti Cupcakes

photo 2 (6)Whew, this week has been crazy busy. Although this is a bit late, I just HAD to blog about the funfetti cupcakes I made for the 4th of July.

I know funfetti cupcakes may seem simple because they come out of a box and it’s just cake — but you honestly can’t beat them. You bring cupcakes, people like you. But if you bring funfetti cupcakes, you’re the life of the party. There’s just something about eating a cupcake with colorful sprinkles in it that just makes you instantly happier with life.

The great thing about the box I bought was that it can make almost two dozen cupcakes! For like $1.50, you really can’t beat that. (Especially since you can buy one cupcake from a cupcake store for $3).

photo 1 (5)photo 3 (4)


My cupcakes turned out pretty well, although I did forget to buy frosting. So remember, when you’re buying a boxed cake mix, frosting might be key. But since I don’t actually like frosting on cupcakes, it didn’t really matter too much.

Hope you all had a lovely 4th!

Garlic Alfredo Tilapia Is Scrumptious

photo 1 (4)
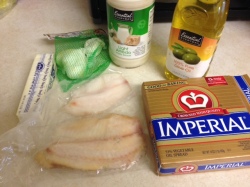
In an effort to mix up the fish I eat, I’ve expanded my fish selection from salmon, to salmon and tilapia. When looking for different ways to make tilapia tasty, I stumbled across the absolute best tilapia recipe ever – garlic alfredo tilapio.

When making it, I adjusted the recipe to one serving. Which made for some problems. Like what is the difference between tsp and tbsp? How many tsps are in tbsps? Luckily I googled that and it turns out google really does know everything!

They have this nice converter where you can figure out how many is in each thing. You really do use math after college (but google does all the work for you). It was pretty fabulous.

photo 3 (3)photo 2 (5)photo 4 (3)

But next problem – it turns out you have to unfreeze tilapia before you cook it. So I put the tilapia in a bag and put the bag in a pot of water. But the directions on the tilapia packaging said the water had to be cold, so that’s why there is ice cubes in the pot.

photo 5 (3)Then after the tilapia was no longer frozen, I patted it dry with a paper towel and put it on tin foil. I wasn’t able to find the creole seasoning in the grocery store, so I ended up using Italian seasoning. Which most likely gave it a different flavoring but I loved it!

While the fish was in the oven, I put the butter, garlic, and alfredo sauce in a pan. Once the fish was done, I used a fork to do the fork test, which my roommate told me about. You put the fork in the fish and twist, and if it breaks easily into flakes, it’s done! You then put the sauce on the fish, add more seasoning and voila, a delicious meal.

Guacamole: A Lesson In Dicing and Mincing

Up until I recently, I didn’t realize how life changing avocado is. Avocado is super healthy for you and can be used for just about any meal. By far though, my favorite use for avocado is guacamole.

 photo 2 (4)This is the best recipe for guacamole that I’ve found. While it doesn’t taste exactly like Chipotle’s guac, it’s still super scrumptious. This recipe calls for avocados, lime, salt, onion, cilantro, tomatoes, garlic and cayenne pepper. I don’t use cayenne pepper since the garlic gives the guacamole enough of a kick.

The first time I made this guacamole, it took me about an hour to make just because I had to look up every single thing. Like what’s diced onion? How does dicing differ from mincing? I don’t know how people cooked before the internet.

What’s diced onion? WikiHow explains it here. Basically you just peel the skin off the onion, cut the onion ends off, cut it in half, cut the onion in strips with the flat end facing downward, and then cut the other direction.

photo 3 (2)What’s minced garlic? WikiHow explains it here. Just cut off the hard end of the garlic, peel off the skin, cut in strips lengthwise, then cut the other direction. To make it super thin, run the knife across the garlic again.

While I ate a majority of the guacamole before I remembered to take a picture, here’s a picture of the avocados partly mashed. I absolutely love this picture because everything looks so fresh! Fresh guac is probably one of my most favorite things in the world. Hope you enjoy!